This blog is dedicated to those esoteric activities directly or indirectly related to miniature gaming, boardgaming and Euro-gaming.


Sunday, July 25, 2021

Critical Moments under the Microscope. Episode 1 – Hidden Bazookas and Passing the ‘Patsy’


Have you ever looked back on a game (of ASL) and wondered “Where did it all go wrong?”, or “How did I manage to cement that victory?”. Well, I certainly have. Some playings have a steady inevitability about them, an accumulation of predictable, incremental effects. For many others though, if you take any time to analyse what happened there will often be a moment, or series of connected events that are pivotal to the final outcome. In this series, we will spend a few minutes reviewing snippets of gameplay, to identify and illustrate these “Critical Moments under the Microscope”!

Note: The following is available as a YouTube video here.

It’s round 1 of the 2021 Illuminating Rounds ASL Tournament, and I’m playing the attacking Germans in ASL Scenario U5 - POINT D’APPUI (from MMP’s “A GI ‘S Dozen”). My opponent is Jason and we’re playing by e-mail. It’s early in the game and Jason is responding to my initial movement of 108 Panzer Brigade halftrack mounted units.


Situation at the end of German Turn 1

He advances his American 119th Infantry, carefully maintaining concealment, to challenge my attack. 


Situation at the start of German Turn 2.

In this scenario the very important 3 American bazookas are hidden until used by SSR, and for the German player this creates uncertainty and a dilemma. The first Critical Moment is not on the board, or in the dice, but in my imagination - “At least one of these counterattacking units must have one of those killer bazookas!” This leads to a series of moves aimed at saving my now ‘endangered’ SPW 250/9 – a unit I wanted to preserve.

So, the plan hinges on firstly ‘freezing’ the unit in 06K2 using Vehicle Bypass – risky with an Open Topped AFV. And then, moving into the 06L1 hex to strip Concealment and maybe even draw fire, but mostly then to allow Bounding First Fire from the threatened halftrack into that then unconcealed unit – a pretty good chance to effect and Break or Pin it, before it gets a shot off with that ‘invisible’ bazooka.

Moving a halftrack (SPW 251/1) in bypass into 06K2, the next Critical Moment came when the American Squad passed a Pre-AFV Attack Task Check (the PAATC - or ‘Patsy’) to enable it to use reaction fire and attack the halftrack in close combat. This is gutsy with a 6 Morale unit, the failure to pass meaning a Pin and an effective ‘freeze’. Jason rolled low again on the Close Combat attack and the halftrack was Eliminated.

Situation during German Turn 2 – the American Squad eliminates the halftrack with CC Reaction Fire.

The Ami Squad was now free to fire outside its hex, meaning that follow up manoeuvres were pinned by its fire, leading to a further overcommitment of forces to strip Concealment and enable that all important Bounding First Fire.

I then attempted to rescue the situation by trying to eliminate these units, but nothing came off. I just threw ‘good money after bad’. It’s fair to say that the dice were not favouring me with this series of connected events, and this just amplified the effect of the two Critical Moments. As losses mounted, initiative swung to the Defender and opportunities to progress the attack were missed.

The irony in all this is that there were no bazookas with these units at all! The worst possible outcome for the halftrack had I known (or assumed) this was a Stun result.

I never really recovered from these losses and time spent avoiding a bazooka shot that was never possible. Was there luck involved, of course, but the impact of that good or bad luck could have been avoided had I made a different decision about the probability or risk of the presence of a bazooka in one or both of those two units.

For the record, I did capture the victory Hex in 03Q8, but I was outnumbered in the end and did not have the resources to hang on against most of the intact America order of battle.

So well done to Jason, and good luck in round 2 of the tournament.

I’ll be back soon with another Critical Moment. Until then, roll low ... when it counts!

Credits:

ASL User Interface – VASL Templates, VASL and VASSAL, Jason, MMP, ASL Scenario Archive.


Saturday, August 31, 2019

Advanced Squad Leader - After Action Report: HF1 - Hatten in Flames


This is something a little different from me. I've been a long time ASL player and having posted the below AAR on facebook though I would also post it here (apologies in advance for the heavy ASL terminology and acronyms).

Hatten in Flames was always going to take a special place for me in the ASL compendium. I am lucky enough to have met the designer Andrew Rogers, and his friend, and my opponent for this game David Shannon, soon after moving to Melbourne many years ago now.

After completing this first play (i.e. HF1) it has indeed taken up position alongside my other all-time favourite Red Barricades.

This AAR focuses on the last moments of the game. Earlier however, Dave asked if he could take the German defenders “to get some practice on the defence he claimed”. Fair enough I thought, I’m partial to the Yanks although not keen on the 6 morale (more on that later!). In picking out the OOB I randomly chose Lt Rogers from the counter mix when looking for the 9-1 – good omen I thought! This seemingly unlikely pick was an augury of things to come.

Dave’s defence was considered and despite early bad luck breaking his INF gun and MMG, fought a tenacious withdrawal to hold the last 2 victory locations with just a single turn left to play. The victory conditions call for the Yanks to take all the victory locations, or if they have a functioning M18 surviving at game end, to take all but one.

I would say that during the game, luck swung wildly for both sides, but mostly with Dave’s dice (his now infamous ‘Samurai’ dice – from ASL Precision Battle Dice). More on this topic later.
My last turn saw me in a tough situation, and I decided to focus on one of the victory locations (K5) and save one of my Hellcats in the process. I had to have things go my way. Suffice to say, I managed to get Lt Rogers, with 3 squads another 7-0 and a hero (created earlier) into the victory location in the advance phase, and to knock off the defenders in a 4-1 Melee (not H-t-H). All I had to do now was survive and fight off the counterattack in his player turn.

Enter the Samurai dice. Germans Prep Fired into K5, 8 at +2 Leader directed… and the roll… 1,1!! Lt Rogers and the 3 squads break, the 7-0 Pins and the hero wounds – bloody Yank 6 Morale. From the jaws of victory … Dave poured in more fire (ineffective this time), then assault moved his counterattack adjacent. My defensive first/final fire ineffective. It would have been very different if Lt Rogers’ stack had not all broken (would have had 36+ at +1 at the adjacent troops!!). Best laid plans …

After the Advancing Fire, my Pinned 7-0 and Wounded hero stood fast (more so than my player morale which was severely shaken). Lt Rogers Low Crawled away in fright into the street, and I had to decide to leave the Pinned 7-0 leader with the Hero to double my firepower for the upcoming CC – despite the added Ambush risk.

Dave advanced into the hex and I avoided being Ambushed, despite his -3 modifier (Concealed unit and 8-1 leader). The odds were now in Dave’s favour, the tables turned. Consulting my Rat Pocket Chart I wondered what the chances of surviving the H-t-H Melee that he had just declared – after all the whole scenario came down to this last roll. The 4-1 odds had a kill# of 11, and with a -1 leader, that meant 12 to Casualty Reduce. Lucky I avoided the Ambush I thought!


Situation at the beginning of the close combat phase ... all the action in K5 is spread out.

Close up!

Enter the Samurai dice. Dave rolled first… 6,6!! There was no point withdrawing. My roll was too high. OK, now double check the numbers and confirm a random selection is required to see who cops the Casualty Reduction! I’m in with a chance here – despite the odds. The leader … a 1, the Hero … a 1!! Argh!! OK – this is getting ridiculous. Now for the wound checks (+1 for the already wounded Hero). All I need to do is have one of these 2 men survive for the win … 1 YES! and 1!

We shook our heads then hands. What an amazing end to the game. Thankyou Dave for being a great and gracious opponent, and to Andy for what is so far a blast of an HASL module. I’m looking forward to HF2.

Facebook post is here (private group). If you are in Melbourne and want to play more ASL, join the facebook group or drop me a note in the comments!

Monday, April 16, 2018

Chain of Command, Jump Off Points, Shock Markers & Terrain

The journey towards Chain of Command readiness continues ...

I'm working on the terrain and game aids before facing into painting my German Grenadiers. The terrain is aimed at Normandy post D-Day and the '29 Lets Go!' campaign.

Results to date:


OK, so that last one is not for the game - it is my new paint organiser ... but having this has helped inspire me to push forward and complete some of what you see above! Didn't realise how many paints I had ... :-(.

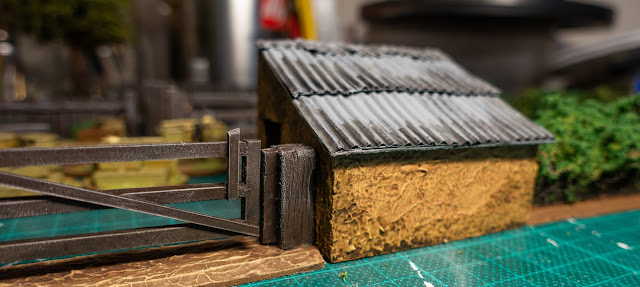
Apart from the items on the Jump Off markers (which are home cast, or for the weapons off the sprue) and the picket fence, this is all scratch built.

Thanks for looking, feel free to leave a comment or question.

Sunday, December 3, 2017

The Battle of Raab, 1809 - 3rd time around

Recently we re-fought 'The Battle of Raab, 1809' for the third time. We used Napoleon's Battles 4th Ed. rule set and a revised scenario, which has since been extended with some 'Additional Options' to provide some options to further balance the scenario.

You may want to read the scenario is available here.

This time, we recorded the game using a time lapse from an overhead web cam.

Enjoy. Comments and questions welcome!


Wednesday, June 7, 2017

Test Figures - 28mm WW2 Germans

Below are some pics of the trio if test figures painted for the Chain of Command project.

They are the start of my German grenadier platoon.

Figures by Warlord Games. Paints are acrylic by Vallejo and washes by GW, Various colours and techniques applied.


28mm Scratch Builds - Painted at last ...

I have finally managed to paint the 2 of the scratch builds I showed in the previous posts, here and even older here. This is all part of the slow preparation towards being able to play TooFatLardies' "Chain of Command".

Here are some pictures taken of the finished product (with some 28mm Warlord Games late war German Heer for scale).

Hope you like them! Feel free to post any comments.


Thursday, June 2, 2016

Little Wars 2016 - The Battle of Raab, 1809: A 2nd Outing

Somewhat confusingly, I'm posting a quick AAR for the second outing of this scenario, held at Little Wars 2016, in Moorabin, Melbourne this weekend past.

So, after a very short discussion, my gaming buddy (Vince) and I decided to put our hard work on public display.

In preparation we modified the scenario from the learnings from our initial playing. Due to a lack of time, despite intentions, we weren't able to swap out any of our older figures with any newly painted ABs - maybe next time.

An early start on Sunday morning saw us travel from the north side of Melbourne to the southern suburb of Moorabin and the Kingston City Hall.

We quickly set up the board and I laid out a pre-prepared defense.


Vince set up to attack in the center and on the Austrian right flank, an a-historical, but interesting alternative to the strategy employed from our first game (an attack on the center and on the Austrian left flank). Below, Eugene contemplates the field before him.


I don't have many pics at hand to show the development of the attack. Fundamentally, the Austrians had to realign to the French attack which unbalanced things for a while. However, the realignment managed to present problems for the French and a number of attacks were made, some repulsed, others drove home. Kis Megyer proved a tough nut to crack with a strong Austrian Line Brigade in the fortified farm complex.

Suffice to say it was a see-sawing affair, and by the time we had to pack up, the game was in the balance. Here are some quick smartphone snaps of the state of the game - from the Austrian left to right.


We are looking forward to our next replay and will hope to learn from our second play, and right our strategic and tactical wrongs in the process.

Let me know if you have any questions or comments.

Thanks for looking.